In the previous post, we discussed Web Push notifications using the @http directive of Hypi.
In this post, we will move forward and configure Firebase Web Push notifications to send the notification to browsers using Hypi’s API gateway.
How to configure Firebase
- Create an account on Firebase using your google account.
Go to Consoleto create a Project.(https://console.firebase.google.com/)
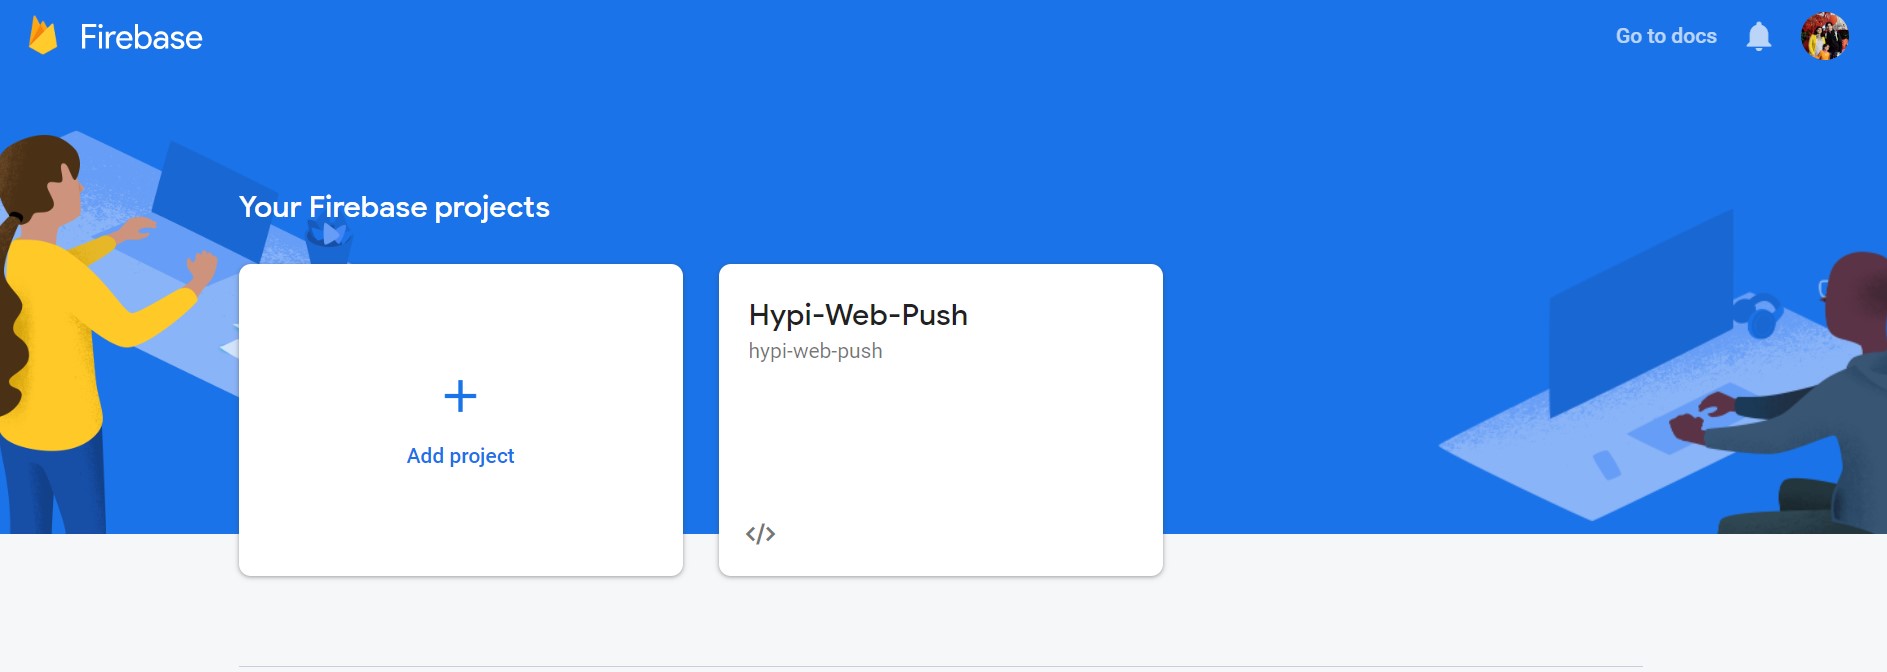
- Enter the required project details.
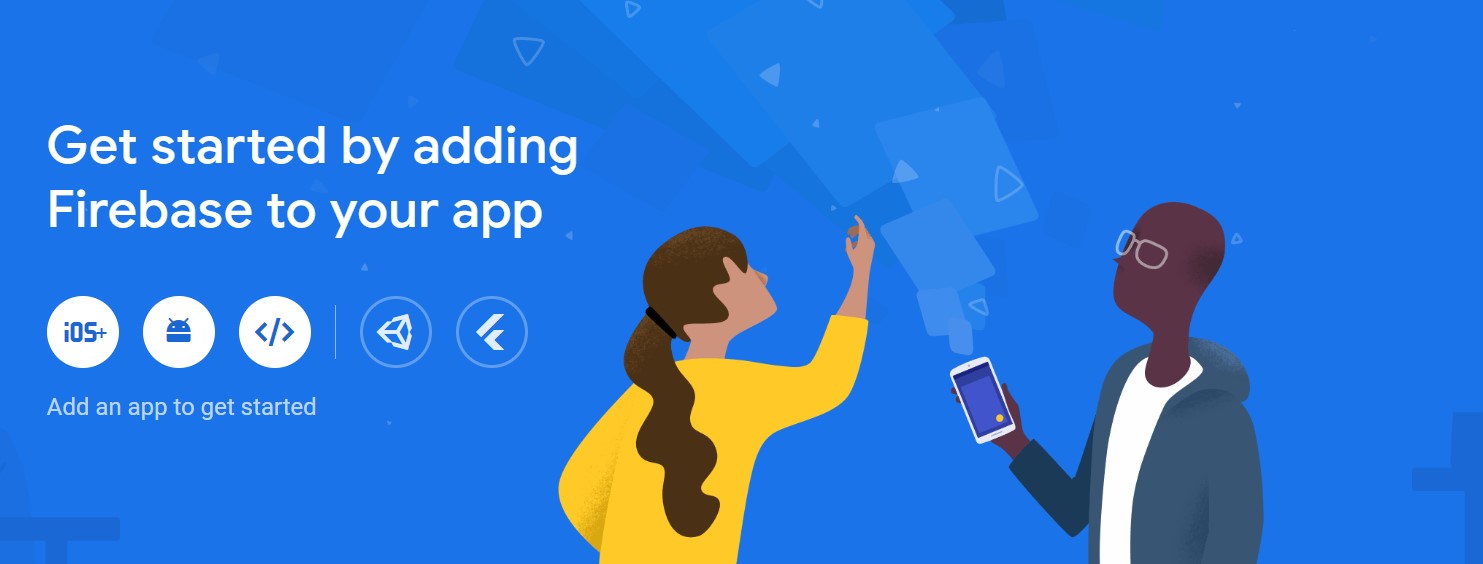
- Add Firebase to your Web App. Click
</>to choose web app.
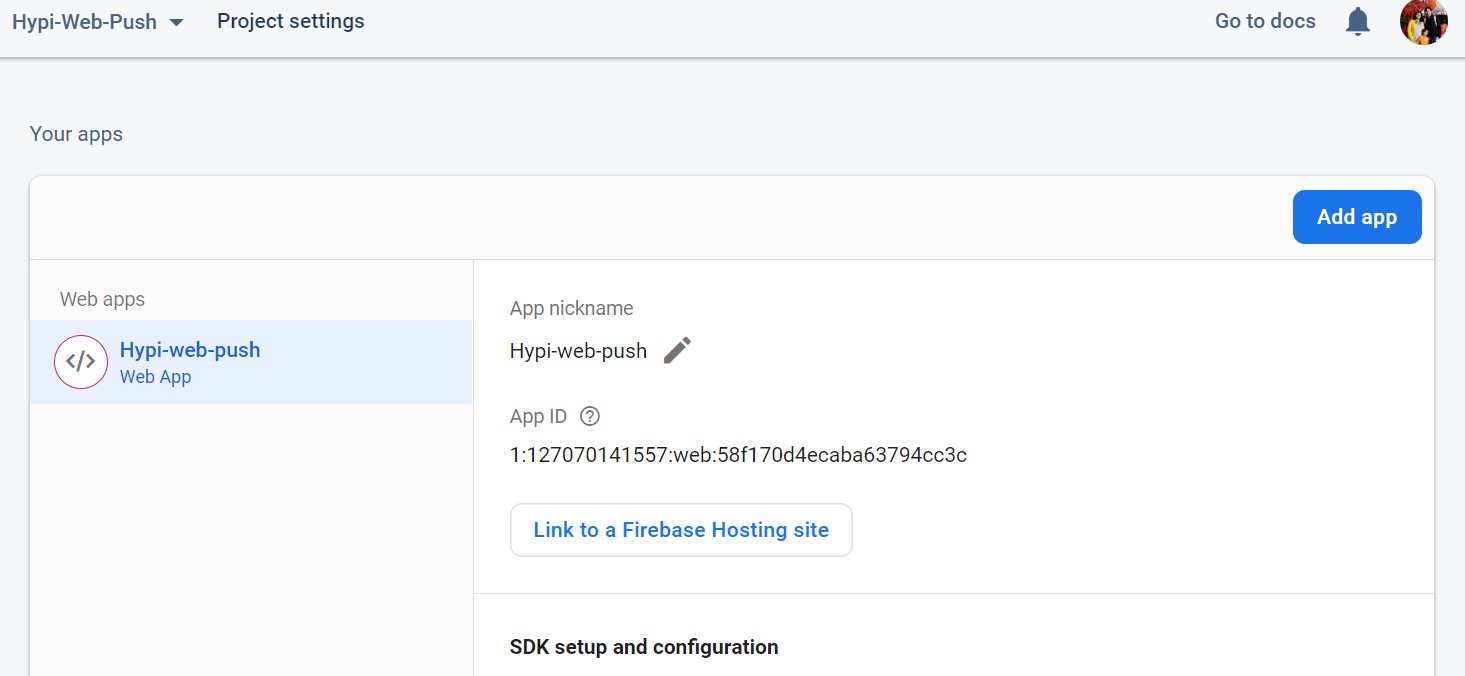
- Under
Project Settings, you will get all the settings to send Web Push notifications.
How to initialize Firebase Cloud Messaging (FCM) on a JavaScript Client
The following code initializes the FCM on a JavaScript Client
// TODO: Replace the following with your app's Firebase project configuration
// See: https://firebase.google.com/docs/web/learn-more#config-object
const firebaseConfig = {
    apiKey: "*****************",
    authDomain: "hypi-web-push.firebaseapp.com",
    databaseURL: "https://hypi-web-push-default-rtdb.asia-southeast1.firebasedatabase.app",
    projectId: "hypi-web-push",
    storageBucket: "hypi-web-push.appspot.com",
    messagingSenderId: "127070141557",
    appId: "*****************"
};

// Initialize Firebase
firebase.initializeApp(firebaseConfig);
const messaging = firebase.messaging();
- Replace Firebase Configurations (firebaseConfig) with your App settings. The configuration is available under
Project Settingson the General tab. Click the Project Settings icon besideProject Overview.
-
initializeAppfunction initializes App on the Firebase platform andfirebase.messaginginitializes Firebase Messaging. - Don’t forget to Include the following files. These files are needed for above code to work.
<script src="https://www.gstatic.com/firebasejs/7.18.0/firebase-app.js"></script>
<script src="https://www.gstatic.com/firebasejs/7.18.0/firebase-messaging.js"></script>
How to generate Device Token to receive Firebase Push Notifications
- A JavaScript client needs to grant permission to Firebase to receive notifications. Once permission is granted, Firebase issues a token to the Device where the Client App is running. This token is needed to send push notifications to the client.
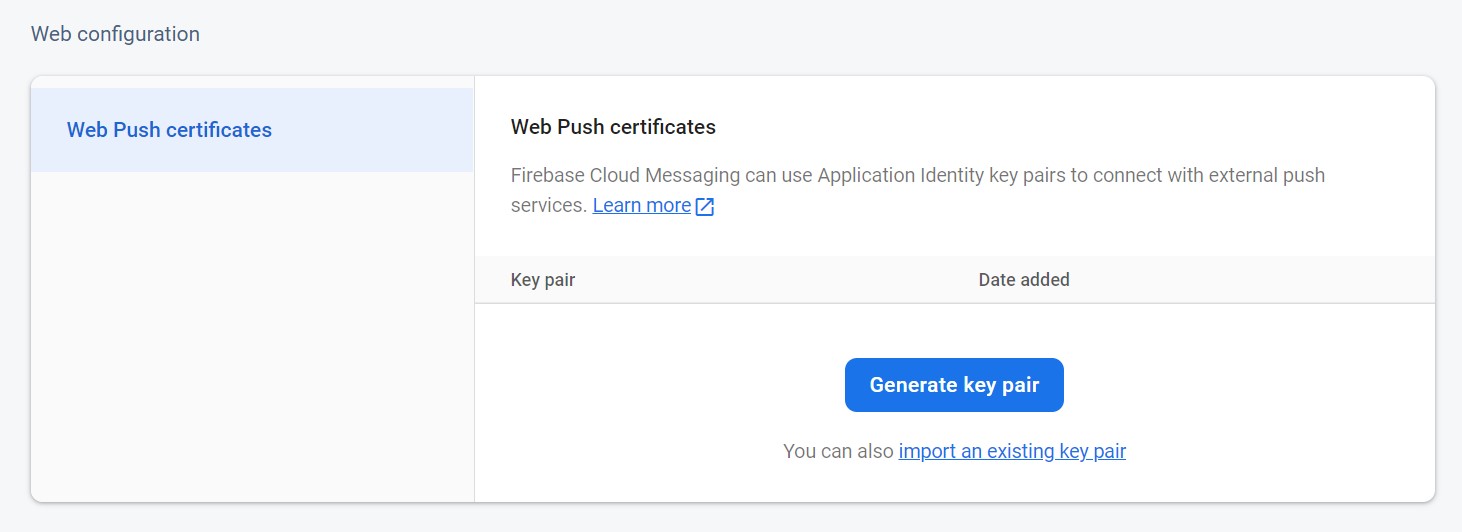
- First, generate a Web Push key pair to enable FCM. Click
Generate key pairunderWeb Push Certificatesconfiguration on the Cloud Messaging tab in the Firebase Console.
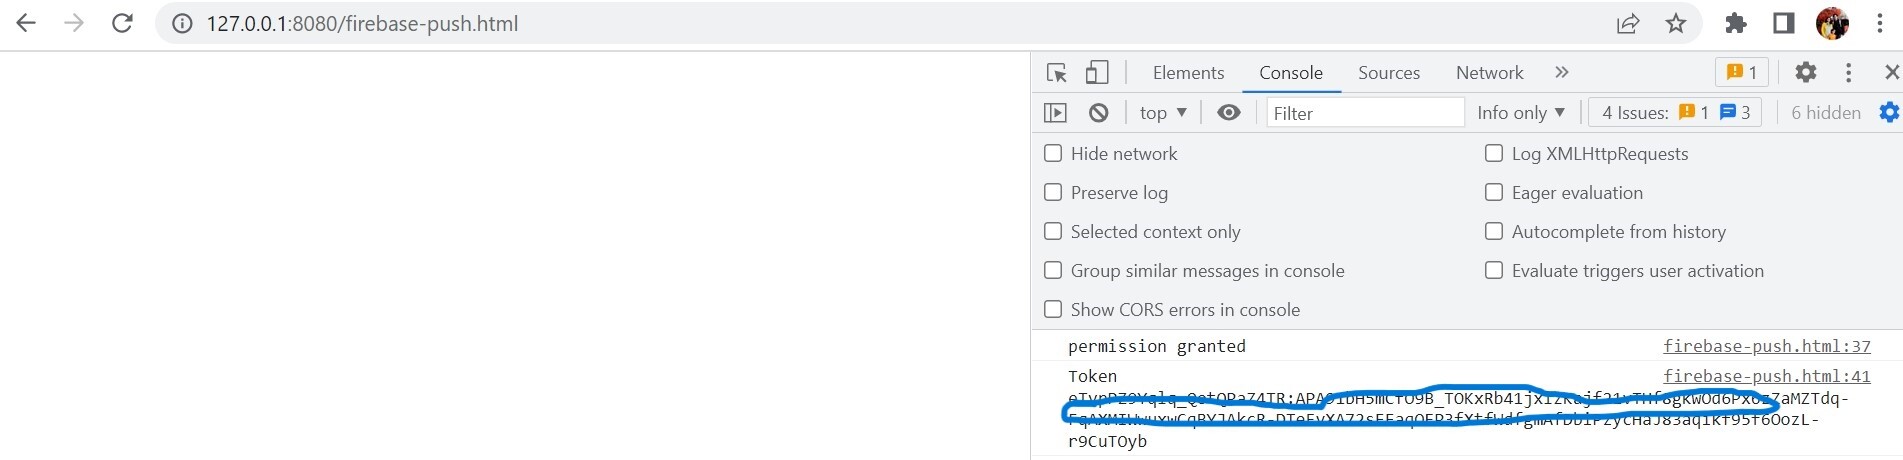
Let’s generate the token now.
messaging.requestPermission()
.then(function() {
   console.log('permission granted');
   return messaging.getToken();
})
.then(function(token) {
console.log('Token',token);
})
.catch(function(err) {
  console.log('An error occurred while retrieving token. ', err);
})
-
requestPermissioncreates the pop-up to get permission from the client to send notifications. ClickAllowto receive the notification. The client needs to grant permission just once. -
getTokengenerates the device token using the web push key generated earlier. This is also called the VAPID (Voluntary Application Server Identification) token. - We are saving the token on the console. But you need to save it to the Database or send it to the server. This token is needed to send push notifications.
Let’s put this JavaScript code inside a simple HTML file under <script>. Run the HTML file on the localhost. For the above code to work the client needs to run on http server.
- Create an empty file
firebase-messaging-sw.jsin the same folder. This file is needed for the above code to work. Keep the file name same. - Create an html file (firebase-push.html) with below code.
<!DOCTYPE html>
<html lang="en">
<head>
    <meta charset="UTF-8" />
    <meta name="viewport" content="width=device-width, initial-scale=1.0" />
    <meta http-equiv="X-UA-Compatible" content="ie=edge" />
    <title>Web Push Notifications</title>
</head>
<body>

<script src="https://www.gstatic.com/firebasejs/7.18.0/firebase-app.js"></script>
<script src="https://www.gstatic.com/firebasejs/7.18.0/firebase-messaging.js"></script>
<script>
// TODO: Replace the following with your app's Firebase project configuration
// See: https://firebase.google.com/docs/web/learn-more#config-object
const firebaseConfig = {
    apiKey: "****************",
    authDomain: "hypi-web-push.firebaseapp.com",
    databaseURL: "https://hypi-web-push-default-rtdb.asia-southeast1.firebasedatabase.app",
    projectId: "hypi-web-push",
    storageBucket: "hypi-web-push.appspot.com",
    messagingSenderId: "**************",
    appId: "*******************"
};

// Initialize Firebase
firebase.initializeApp(firebaseConfig);
const messaging = firebase.messaging();

//Grant permission and Generate Token
messaging.requestPermission()
.then(function() {
	console.log('permission granted');
	return messaging.getToken();
})
.then(function(token) {
	console.log('Token',token);
})
.catch(function(err) {
	console.log('An error occurred while retrieving token. ', err);
})

// Handles incoming messages
messaging.onMessage(function(payload) {
    console.log('Message received. ', payload);
});
</script>
</body>
</html>
- Run
http-servercommand on the command line. If it is not installed, install using npm.(npm install http-server) - Open html file on the server, you can see the generated token on the console. Copy the token and save it.
How to configure client to receive Push Notifications.
Initialize FCM in the file firebase-messaging-sw.js. The code acts as Service Worker. This helps to receive notifications even if the application is in the background.
importScripts('https://www.gstatic.com/firebasejs/8.10.0/firebase-app.js');
importScripts('https://www.gstatic.com/firebasejs/8.10.0/firebase-messaging.js');

const firebaseConfig = {
    apiKey: "AIzaSyAphAw1se1UQfbxe-TXxufoW05vqjRrETE",
    authDomain: "hypi-web-push.firebaseapp.com",
    databaseURL: "https://hypi-web-push-default-rtdb.asia-southeast1.firebasedatabase.app",
    projectId: "hypi-web-push",
    storageBucket: "hypi-web-push.appspot.com",
    messagingSenderId: "127070141557",
    appId: "1:127070141557:web:58f170d4ecaba63794cc3c"
};

// Initialize Firebase
firebase.initializeApp(firebaseConfig);
const messaging = firebase.messaging();
- Enter below code under
<script>in the HTML file. This code handles incoming messages or http payload and logs them on the console.
messaging.onMessage(function(payload) {
    console.log('Message received. ', payload);
});
How to send Push Notifications using Hypi’s API gateway.
Hypi as a backend server can send push notifications to the browser. To send an http notification, here are the details.
Method: POST
Endpoint url : https://fcm.googleapis.com/fcm/send
Content-Type: application/json
Authorization : key=<Firebase Server Key>
Payload:
{
 "notification": {
   "title": "Hypi's Push Notification",
   "body": "Future is low code"
 },
 "to" : "device-token"
}
We have generated device-token earlier. You can get the Server Key under the Project Settings on the Cloud Messaging tab.
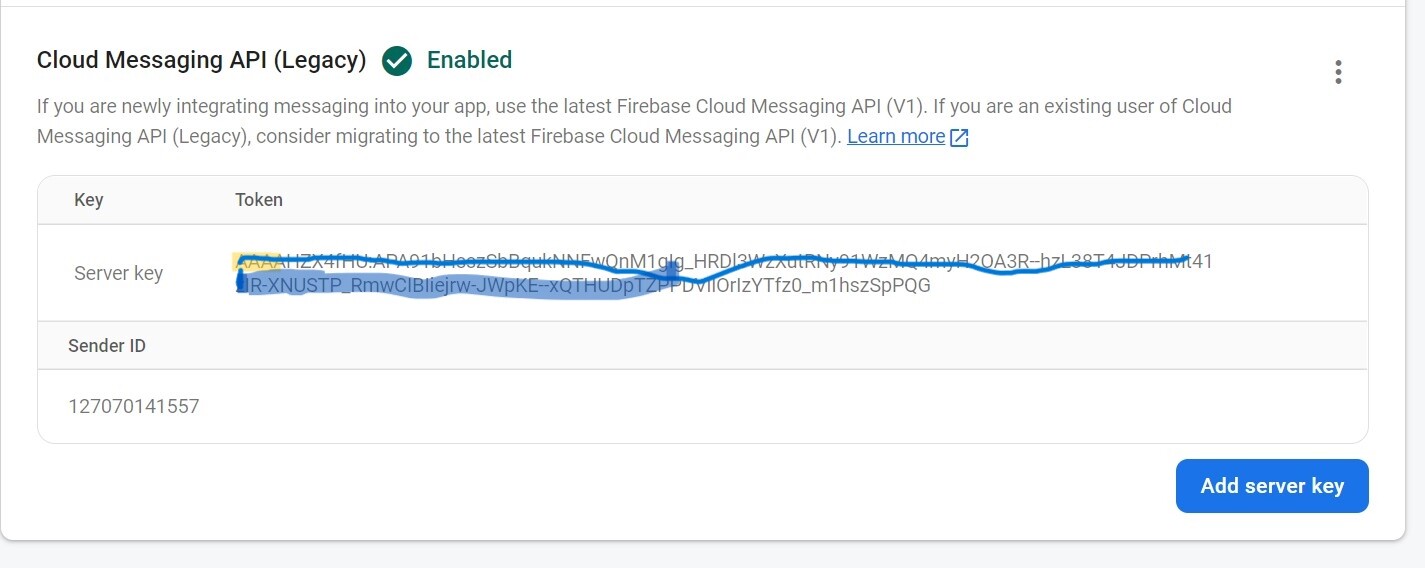
If the Server key is unavailable you can generate one by enabling Cloud Messaging.
Enter the below code on Hypi’s schema editor.
type Mutation {
     sendNotification(title:String,body:String): Json
     @http(
       method: POST,
       url: "https://fcm.googleapis.com/fcm/send",
       headers: """{"Content-Type": "application/json","Authorization":"key=${settings['SERVER_KEY']}"}"""
       inline: {
             requestTemplate: """{"to": "${settings['VAPID_TOKEN']}","notification" : {"title" : "$vars.title", "body": "$vars.body"}}""",
             responseTemplate: """{"result": $!{response}}"""
        },
    )
 }
Save SERVER_KEY and VAPID_TOKEN under Environment settings. You can enter the values at run time.
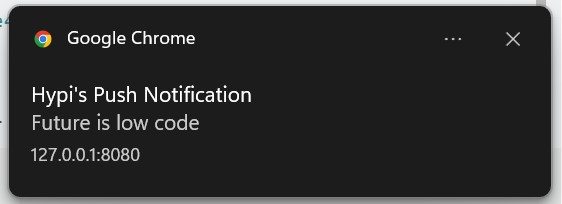
Alright! Let’s send the push notification! Execute the HTTP request on Hypi’s GraphQL Playground.
mutation {
  sendNotification(title:"Hypi's Push Notification",body:"Future is low code")
}
#result
{
  "data": {
    "sendNotification": {
      "result": {
        "multicast_id": 8780355525039524000,
        "success": 1,
        "failure": 0,
        "canonical_ids": 0,
        "results": [
          {
            "message_id": "0f318888-2c44-46b4-ae4d-f27b3f0ef783"
          }
        ]
      }
    }
  }
}
You can see the push notification on the screen as soon as the request gets executed.
Concluding Note
This is the general introduction to the integration of Firebase with Hypi. Firebase offers many features and Hypi can help you use those features in your app with ease.
Using the power of Low Code, Hypi is happy to help with the App development!