How can you connect your application with Hypi’s low code backend?
Hypi is API based low code platform. This tutorial demonstrates API Set up to connect with Hypi and access the functionalities provided by it.
Let’s check how to set up Hypi APIs so that they work for you!
HTTP Headers
To use an HTTP connection, you need three kinds of headers. The first one is the content type. Set the content type of the request to ‘application/json‘. The second one is the Hypi Domain of the instance to which you are making a request. The third one is the Authorization header. Authorization is the session Token obtained after login. You may check these settings here.
Authorization
An anonymous user can send the HTTP request without an Authorization token only if it is enabled on the instance. It is not enabled by default. Login APIs do not require the Authorization header. After Login, the Authorization token gets generated.
Creating an account does not require the Authorization header if anonymous registration is enabled on the instance. Anonymous registration is disabled by default. If it is disabled, new accounts can only be created by an existing user.
The options to enable Anonymous registrations and requests for an instance are provided on the user interface.
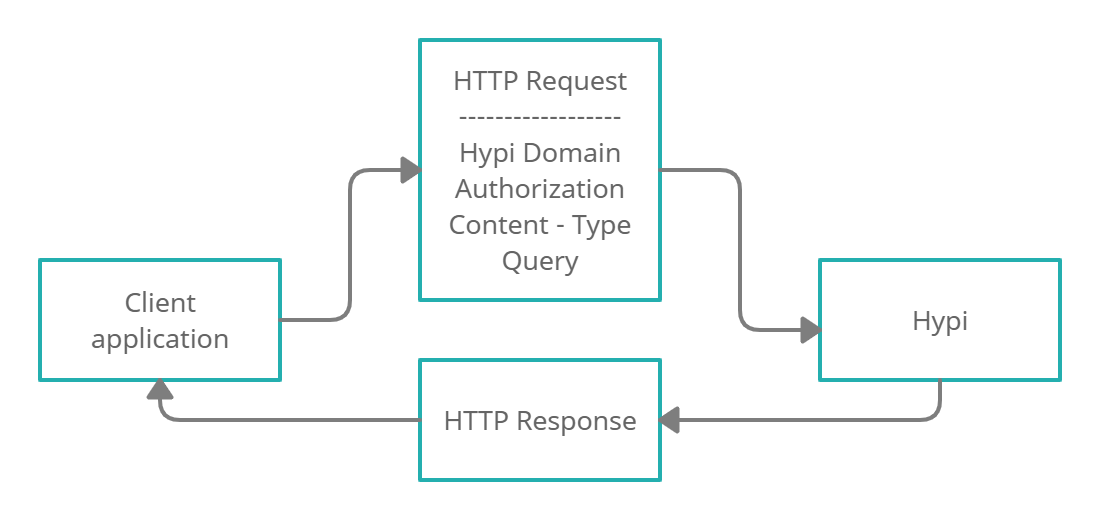
API URLs
There are three URLs you may use to access the functions provided by Hypi. You can make an HTTP connection to an API endpoint. Or you may use the REST-like requests to an URL. The WebSocket connection is also possible.
https://api.hypi.app/graphql – Execute GraphQL queries against your instance. This unique URL is an endpoint that represents an object or collection of objects within the Hypi domain. You will point your HTTP client at this endpoint to interact with Hypi data resources.
https://api.hypi.app/rest – Use standard REST-like requests to execute queries against your instance. RESTful APIs are explained here and we will also cover them in a separate tutorial.
wss://api.hypi.app – allows you to subscribe to updates via WebSockets. Establishing a WebSocket connection provides a persistent connection between client and server and facilitates message passing between them. Subscription API works using WebSocket connection.
Examples
Hypi is Language agnostic platform. It is compatible with most languages.
(JavaScript, Swift, Go, PHP, Python, Ruby, Rust, .NET, Docker, Java (Scala, Kotlin, Groovy, and other JVM languages)).
To demonstrate the API Set up, we will consider a simple Javascript code. Let’s see how to set up an API connection between Javascript code and Hypi’s low code backend.
Let’s connect to the Hypi domain delirious.apps.hypi.app through an endpoint https://api.hypi.app/graphql.
Execute any query on the instance. And copy the CURL request from there.
In the below javascript, we will just copy the hypi domain, authorization key, and GraphQL query from the CURL request.
const Data={
query:'{\nget(type: Post,id:\"01F52TZ03J426MHJYKYRB9Q8PT\"){\n… on Post{\ntext\n}\n}\n}\n'
};
fetch('https://api.hypi.app/graphql',{
method: 'POST',
body: JSON.stringify(Data),
headers: {
'Content-type':'application/json',
'Authorization':'test-Auth-token',
'hypi-domain':'delirious.apps.hypi.app'
}
})
.then(response => response.json())
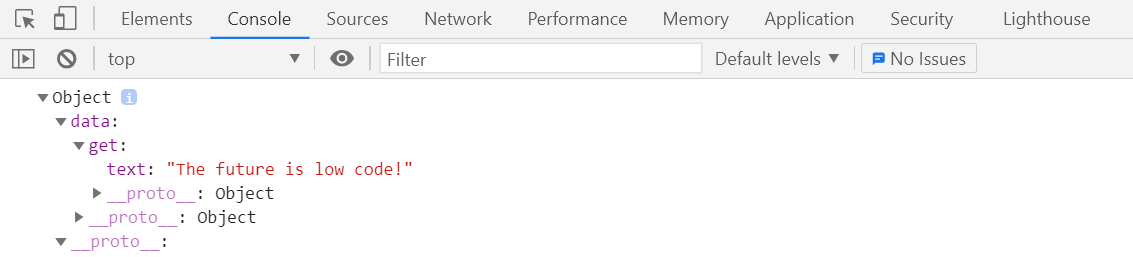
.then(json => {console.log(json);
});
The above script makes an HTTP connection to the hypi instance using fetch and logs the response onto the console. Copy the script in fetchGet.js file.
We can use the simple HTML code to execute this script ( fetchGet.js) in the browser.
<!DOCTYPE html>
<html lang="en">

<head>
    <meta charset="UTF-8" />
    <meta name="viewport" content="width=device-width, initial-scale=1.0" />
    <meta http-equiv="X-UA-Compatible" content="ie=edge" />
    <title>JavaScript HTTP Requests</title>
</head>

<body>
    <script src="./fetchGet.js"></script>
</body>

</html>
In the browser console, (Right Click-> Inspect → Console) check the response.
Concluding Note
We have seen an easy way to make an API Set up to connect with Hypi’s low code platform and execute the queries.
In the next tutorial, we will know more about Hypi’s API Gateway.